Pat's Tips and Techniques for Designing Paper Airplanes
Designing Your Own Paper Airplanes
Actually designing paper airplanes is not hard. For the science fair student we may need to add some equations and/or deeper explanation as to the "whys" for these tips (and that information can be found in the eBook section). But, for the average person who just wants to experiment by folding and throwing here are a few tips to help reduce how many tries it takes to get a winner.
Step #1 is to decide what type of paper airplane you want - a dart, a straight glider, or an aerobatic airplane. A dart is a long, thin, sleek folded paper airplane that produces very little lift. It is made to be thrown very hard and go a long way by having very little drag. It won't stay in the air long because it doesn't have any ability to float. A true glider on the other hand has wing that produce lift and can stay airborne for longer periods of time. These come in three types - the faster straight glider, the slower glider that may even be trimmed to do long curved acrobatic flights, and a mid speed compromise between the two.
The dart is the easiest to design since all you are trying to do is fold as much of the paper toward the center as possible while leaving just enough "wing" and "fuselage" to act like rocket fins. About all you can do is start with a classic dart (or the same folds with the paper turned sideways) and start adding extra folds. These extra folds can add more weight at the "wing" edges or move more weight to the center to narrow the plane further. It does not seem much can be done but there are still a lot of published designs on people's ideas to improve the classic dart.
For a glider, wither a straight one or an acrobat, Key Point #1 is getting the balance correct. This means that the weight and the lift must work together to keep the nose of the airplane at a certain angle relative to the ground. This angle is called the angle of attack and controls how much lift the plane receives. The larger the angle the more lift. From here we need to decide if we want a slower "floater" or a straight and fast glider. The reason is that a "floater" or "acrobatic" style paper airplane requires a lot of lift compared to a straight flier. The best ways to get this extra lift is either by more wing span or by increasing the angle of attack. We are going to look a little deeper into the idea of increasing the angle of attack. If we look at the illustration below we notice that by shifting the weight of a straight glider forward it can become more acrobatic. However we must balance the plain by heavy trimming or adding a tail. This increases the angle of attack (more lift) but increases drag slowing the plane down. Usually resulting in a mid speed glider.
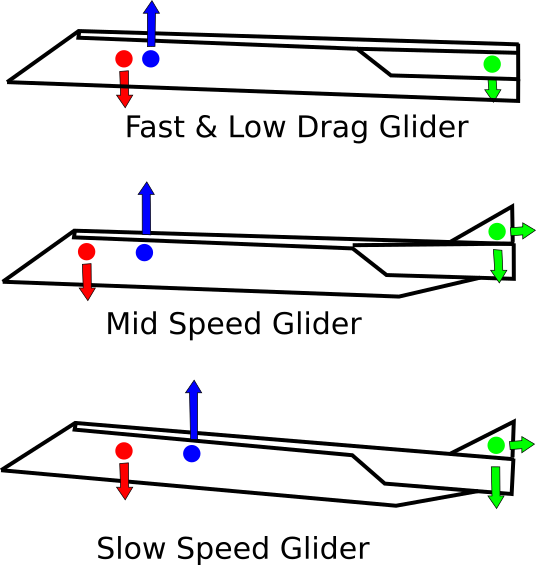
However, if we leave the weight alone; but, increase the tail loading (bigger tail or cutting aileron tabs) we force an even larger angle of attack; thus, moving the center of lift back. Often, going to a delta wing type of aircraft will have the same result.
Note: it is very hard to design a folded paper airplane that does looping type of acrobatics. One of the reasons for this is using a rectangular sheet makes if difficult to make a long wing span and fairly short wing cord (width). The best candidates for this type of plane is one whose shape is cut out prior to folding. This was popular in the 1960's time frame. But once glued card stock planes were available they could do a better job.
Some last tips:
- Start with a smooth paper you have had good success with in the past. This can be either 20 lb or 24 lb.
- Watch first flight to see if the weight (center of gravity) must be adjusted. If nose goes up, then you need to move weight forward. Think of folds that will get it there. If nose goes down, try a tail or trimming before changing folds to move weight back.
- If plane rolls over on its back, it need winglets added/changed (fold opposite direction) or possibly it needs the wings folded backwards from where they are currently by turning the paper over before folding wings.
- There is usually some way to tuck in those loose flaps.
- Realize that many people have been folding paper over the last one hundred years and have probably already come up with a design like yours. If you find out later that your plane actually had been made by someone else in the past, don't despair – you still designed it too.
- Of all my designs, (70+) I expect they have been built by others in the past but I can't find directions for them. So I suggest documenting your work.
