Trimming and Adjusting Paper Airplanes
This section is going to show how to trim and adjust paper airplanes in order to optimize flight performance. In
this section I am not going to go into depth on why we are making these adjustments. A much deeper discussion on
the why's of these adjustments can be found in the eBooks section of this site.
No matter how well we fold, we will most likely have to trim our plane. We will need to decide if we are going to
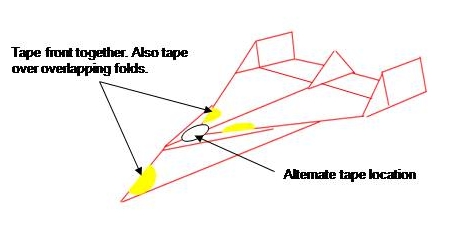
tape our planes or leave them open. For many years, I hated the idea of having to use tape on a paper airplane.
But, I finally realized that it did make better flying gliders. To keep it neat I prefer to use ľ" diameter color
dot labels. However, if you want to fly in an official contest you must use regular scotch tape.
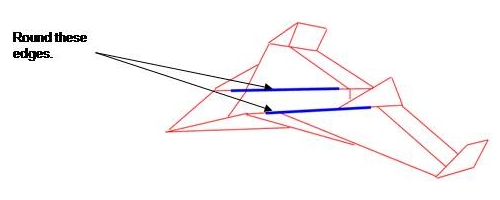
If you don't tape then you will have to smooth out some of the edges. Air does not like to flow over or across
sharp corners (to keep our airplanes neat we tend to keep our folds sharp). This can cause the plane to want to
spin to one side or the other if you don't round the edges between the body and the wings as shown below. To
round them all you have to do is rub the crease between your thumb and forefinger. Just enough to allow the paper
fibers to "curve" around the bend a little.
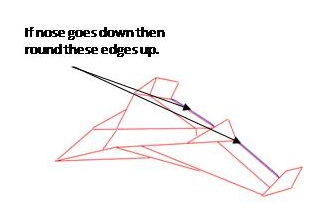
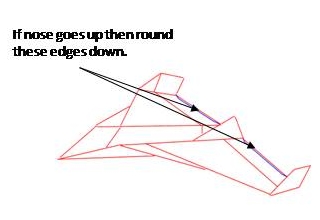
The next part to adjusting is to get straight and level flight. If the nose is going down or plane just doesn't
have enough lift then curve back (trailing) edge of wing up as shown. If nose goes up then curve trailing edge
down. For both of these adjustments, you may have to make curved edges and then straighten back as good as you
can while leaving just a very slight adjustment. This adjustment can be done between the thumb and forefinger but
can also be done by laying the airplane down on a desk top with just a slight overhang of the back edge of the
wing off of the desk top. Use the forefinger to hold down and pull the plane from under the finger causing a
little "stretch" in the paper fibers. Then using the thumb and forefinger try to straighten back out the trailing
edge. Some of the classic styles of planes actually cut tabs to bent to make these adjustments but unless the
directions call for it that action should not be necessary.
This same type of adjustment is used to make a plane that curves to one side go straight (or adds a curve if
desired). If you have a plane curving to the right then add a little bend up on the left wing (or down on the
right wing, depending on which will keep the plane level). If the plane curves to the left do the opposite
adjustments.
Next, and very important, if the plane has a tendency to flip over and fly upside down, then try folding the fins
to the opposite side, or add fins if there are none. Even if the directions say to fold the fins down a
particular plane may actually require the fins to be folded up and vice versa.
Adding or removing the tail can become necessary when going from one type of paper to another. Adding a tail will
bring the nose up and removing one will bring the nose down. This is a more drastic adjustment then curving the
trailing edge of the wing.
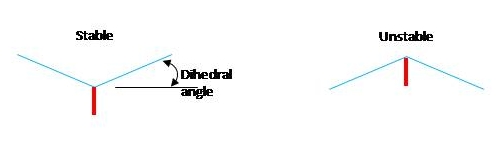
If the plane spins out of control, then make sure that the wings are angled up, not down. This angle is called
dihedral angle and is important for stability (helps prevent rolling).
This may sound like a lot of adjustment but the truth is that with just a few practice planes it becomes pretty
easy! Have fun and enjoy - learning how to trim a paper airplane takes so much frustration away when things don't
go right.